
Identity Server
IdentityServer is a .Net/Katana-based framework and hostable component that allows implementing single sign-on and access control for modern web applications and APIs using protocols like OpenID Connect and OAuth2. It supports a wide range of clients like mobile, web, SPAs and desktop applications and is extensible to allow integration in new and existing architectures.
Features
- Authentication as a Service Centralized login logic and workflow at a single & well-secured place.
- Single Sign-on / Sign-out Single sign-on (and out) over multiple application types like web or mobile.
- Access Control for APIs Issue access tokens for APIs for various types of clients, e.g. server to server, web applications, SPAs and native/mobile apps.
- Federation Support for external social identity providers like Google, Facebook etc, as well as integration for enterprise identity management systems via SAML and WS-Federation.
- Customization The most important part – every aspect of IdentityServer can be customized to fit your needs. Since IdentityServer is a framework, you can write code to adapt the system in a way it makes sense for your scenarios.
Terminology
Before we proceed, let’s look at some terminology used by OAuth and Identity Server.
OpenID Connect Provider (OP)555
OpenID Connect Provider is a piece of software that implements OpenID Connect Protocol, (which is built on top of OAuth2) and issues Security Tokens to Clients. Please refer to the link https://openid.net/connect for details about OpenID Connect. There are other terms which refers to OP like Security Token Service (STS), Identity Provider, Authorization Server. Identity Server is an OpenID Connect Provider.
Client
A client is a piece of software that requests tokens from Identity Server (OP) – either for authenticating a user or for accessing a resource. It is also known as Relying Party (RP). To be able to get tokens from OP, client must be registered with OP. A client can be a Web Application, a Single Page Application (SPA), Mobile Application or a Server Process.
Scope
Scopes are identifiers for resources that a client wants to access. This identifiers need to be sent to the OP during an authentication or token request. By default every client is allowed to request tokens for every scope, but we can restrict it. There are 2 types of Scopes.
Identity scopes
Requesting identity information (aka claims) about a user, e.g. his name or email address is modeled as a scope in OpenID Connect.
Resource scopes
Resource scopes identify web APIs (also called resource servers).
Identity Token
An identity token represents the outcome of an authentication process. It contains at a bare minimum an identifier for the user (called the sub aka subject claim). It can contain additional information about the user and details on how the user authenticated at the OP.
Access Token
An access token allows access to a resource. Clients request access tokens and forward them to an API. Access tokens contain information about the client and the user (if present). APIs use that information to authorize access to their data.
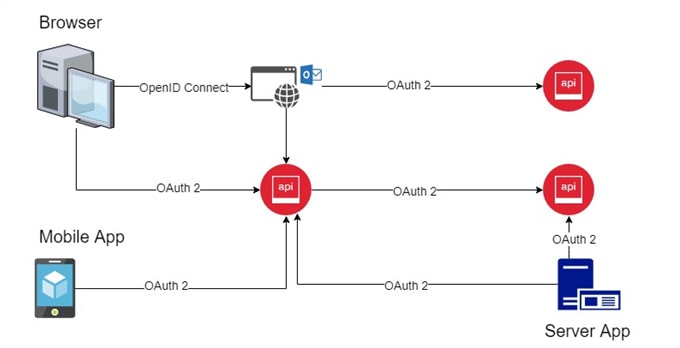
Applications Interactions
Modern web applications are not only a single standalone application but instead they are array of applications interacting with one another as shown in the following diagram.

As seen in the diagram;
- Browser communicates with Web Application.
- Web application and Mobile APP communicate with APIs
- APIs interacts with other APIs
- Server Apps (e.g. Windows Service) communicate with APIs.
All of this communication needs to be authenticated to prevent attacks and secure data. We can use OAuth and OpenID connect for this as shown in the following diagram.
As seen in the following diagram, we need to use combination of OpenID connect an OAuth2. Identity Server 3 is an implementation of these two protocols and is highly optimized to solve the typical security problems of modern applications.
Identity Server Flows
OAuth2 and OpenID connect specify how authentication is handled by OP; which things are sent to client and how in terms of flows/grants. Identity Server provides following flows.
- Authorization Code flow
- The Authorization Code flow returns an authorization code after user authentication that can be used to retrieve Access Token and Refresh Token.This flow requires client authentication using ClientId and Client Secret which can be used to get Access Token from back end. The access token is not exposed to user agent. It also supports long lived refresh tokens which can be used to renew expired access token.
- This flow obtains the authorization code from the authorization endpoint and all tokens are returned from the token endpoint.
- This flow is suitable only for clients who are capable of maintaining a client secret between itself and the STS securely, for example Server side MVC applications.
- Implicit flow
- This flow requests tokens without explicit client authentication, instead using the redirect URI to verify the client identity
- Since this flow does not require explicit client authentication; Refresh Tokens are not supported. So to renew token, the client needs to send request to authorization endpoint.
- This flow obtains all tokens from authorization endpoint only.
- It is suitable for browser applications like Single Page Applications.
- Client Credentials Flow
- This is pure OAuth2 flow, OpenID connect is not involved in this flow.
- This flow is used when applications request an access token to access their own resources, not on behalf of a user. For example, server to server communication like API to API call.
- The client is authenticated by ClientId and Client Secret.
Sample Application
We’ll build 3 web applications.
- Authentication Server using Identity Server – MVC Application
- Client Application – MVC Application
- Resource Server – Web API
Authentication Server Create a new Empty MVC application with ”No Authentication”. Enable SSL for the application from the properties window as shown in the following image.

Install following packages to the application via nuget.
- Owin.Host.Systemweb
- IdentityServer3
We need to register each of our client applications that wish to use Identity Server for Authentication. We also need to register users and define scopes. In real life scenario this will be saved in a database but for out application we’ll save it in memory.
Clients
We’ll register each of our clients by creating an instance of Client as shown below.
new Client
{
  ClientId = "TestClient",
  ClientName = "Demo Client Application",
  Enabled = true,
  Flow = Flows.Implicit,
  RequireConsent = false,
  RedirectUris = new List<string>
  {
      "http://localhost:52481/"
  },
  PostLogoutRedirectUris =new List<string>
  {
      "http://localhost:52481/"
  },
  AllowedScopes = new List<string> {
    Constants.StandardScopes.OpenId,
    Constants.StandardScopes.Profile,
    Constants.StandardScopes.Email,
    "GreetingsAPI"
  }
}
</string></string></string>
The above client will be able to request scopes defined in AllowedScopes property only. Here we’ll use Implicit Flow for simplicity.
Users
We’ll register just one user for now as shown below
public class Users
{
  public static List<inmemoryuser> Get()
  {
    return new List<inmemoryuser> {
      new InMemoryUser {
        Subject = "ABCD-1234-EFGH-5678",
        Username = "testuser",
        Password = "123456",
        Claims = new List<claim> {
          new Claim(Constants.ClaimTypes.PreferredUserName, "TestUser"),
          new Claim(Constants.ClaimTypes.Name, "Test User"),
          new Claim(Constants.ClaimTypes.Email, "test@test.com")
        }
      }
    };
  }
}
</claim></inmemoryuser></inmemoryuser>
Scopes
We’ll use some built in scopes as well as create a new one as shown below that will be used in the Web API we’ll create.
public class Scopes
{
  public static IEnumerable<scope> Get()
  {
    return new List<scope> {
      StandardScopes.OpenId,
      StandardScopes.Profile,
      StandardScopes.Email,
      StandardScopes.Roles,
      new Scope
      {
        Enabled = true,
        DisplayName = "Greetings API",
        Name = "GreetingsAPI",
        Description = "Access to the Greetings API",
        Type = ScopeType.Resource
      }
    };
  }
}
</scope></scope>
Configuring Identity Server
We’ll configure IdentityServer in the startup class. Here we’ll provide information about the clients, users, scopes and the signing certificate. In production we should load the signing certificate from the Windows Certificate Store. But here we’ll use test signing certificate provided by Identity Server and we’ll add it in our project itself.
Please follow the instructions provided in the following link to configure the certificate.
https://github.com/IdentityServer/IdentityServer3.Samples/tree/master/source/CertificatesOpen the Startup class and add the following code to it.
public class Startup
{
  public void Configuration(IAppBuilder app)
  {
    app.Map("/identity", identity =>
     {
       identity.UseIdentityServer(new IdentityServerOptions()
       {
         SiteName = "Authentication Server",
         SigningCertificate = LoadCertificate(),
         Factory = new IdentityServerServiceFactory()
               .UseInMemoryClients(Clients.Get())
               .UseInMemoryScopes(Scopes.Get())
               .UseInMemoryUsers(Users.Get())
       });
     });
  }

  X509Certificate2 LoadCertificate()
  {
    return new X509Certificate2(
      string.Format(@"{0}binidentityServeridsrv3test.pfx", AppDomain.CurrentDomain.BaseDirectory), "idsrv3test");
  }
}
Here we’ve mapped “/identity” path for Identity Server and loaded configurations from classes we defined earlier.
We’ll need to make “runAllManagedModulesForAllRequests” to true in web.config otherwise some of Identity Server’s embedded resources will not be loaded correctly. Add following to web.config.
<system.webserver>
  <modules runallmanagedmodulesforallrequests="true">
</modules></system.webserver>
This completes our Authentication Server setup. Now we’ll create another application that will be one of the clients to this Authentication Server.
Client Application
Create a new MVC application with “No Authentication” and add following packages to it via nuget.
- Owin.Host.Systemweb
- IdentityServer3
- Owin.Security.Cookies
- Owin.Security.OpenIdConnect
Configure the cookie middleware in StartUp.cs with its default values
app.UseCookieAuthentication(new CookieAuthenticationOptions
{
  AuthenticationType = "Cookies"
});
Now we’ll configure Identity Server as OpenID Connect Provider as shown below.
app.UseOpenIdConnectAuthentication(new OpenIdConnectAuthenticationOptions
{
  Authority = "https://localhost:44374/identity",
  ClientId = "TestClient",
  RedirectUri = "http://localhost:52481/",
  ResponseType = "id_token",
  Scope = "openid email profile",
  SignInAsAuthenticationType = "Cookies"
});
Here the Authority is the url of our Authentication Server, ClientId is the ClientId we registered with the Authentication Server, ReirectUri is the url of this application, which is also registered with Authentication Server. ResponseType is “id_token” which specifies we need Identity Token in response of successful user authentication. Scope is space separate values of the user claims we require. The “opeid” scope must always be there.
The “OpenIdConnectAuthenticationOptions” has also provides various notifications raised on specific events, which we can use to our requirements. We can store the claims received from the Authentication Server in a cookie using “SecurityTokenValidated” notification as shown below.
Notifications = new OpenIdConnectAuthenticationNotifications
{
  SecurityTokenValidated = n =>
  {
    var claims = n.AuthenticationTicket.Identity;
    var sub = claims.FindFirst(IdentityServer3.Core.Constants.ClaimTypes.Subject);
    var name = claims.FindFirst(IdentityServer3.Core.Constants.ClaimTypes.Name);
    var email = claims.FindFirst(IdentityServer3.Core.Constants.ClaimTypes.Email);
    var username = claims.FindFirst(IdentityServer3.Core.Constants.ClaimTypes.PreferredUserName);

    var nid = new ClaimsIdentity(claims.AuthenticationType);
    nid.AddClaim(new Claim("id_token", n.ProtocolMessage.IdToken));
    nid.AddClaim(sub);
    nid.AddClaim(name);
    nid.AddClaim(email);
    nid.AddClaim(username);
    n.AuthenticationTicket = new AuthenticationTicket(nid, n.AuthenticationTicket.Properties);
    return Task.FromResult(0);
  }
}
Then we need to have a protected resource; so if a user tries to access that resource; the user will be redirected to Authentication Server if that user is not already authenticated. We’ll create a new Action Method “MyProfile” we’ll protect it by adding “Authorize” attribute. This action method will show claims returned after user is authenticated as shown below.
MyProfile Action Method
[Authorize]
public ActionResult MyProfile()
{
  var claims = (User as ClaimsPrincipal).Claims;
  var idClaim = claims.FirstOrDefault(c => c.Type == IdentityServer3.Core.Constants.ClaimTypes.Subject);
  var nameClaim = claims.FirstOrDefault(c => c.Type == IdentityServer3.Core.Constants.ClaimTypes.Name);
  var emailClaim = claims.FirstOrDefault(c => c.Type == IdentityServer3.Core.Constants.ClaimTypes.Email);
  var usernameClaim = claims.FirstOrDefault(c => c.Type == IdentityServer3.Core.Constants.ClaimTypes.PreferredUserName);

  var model = new ProfileModel
  {
    Id = idClaim.Value,
    Name = nameClaim.Value,
    Email = emailClaim.Value,
    Username = usernameClaim.Value
  };

  return View(model);
}
MyProfile View
@model ClientApplication.Models.ProfileModel
@{
    ViewBag.Title = "Profile";
}

<h2>Profile</h2>

<div class="col-md-12">
    <div class="form-group">
        <label class="control-label">Id</label>
        <p class="form-control-static">@Model.Id</p>
    </div>
    <div class="form-group">
        <label class="control-label">Name</label>
        <p class="form-control-static">@Model.Name</p>
    </div>
    <div class="form-group">
        <label class="control-label">Email</label>
        <p class="form-control-static">@Model.Email</p>
    </div>
    <div class="form-group">
        <label class="control-label">Username</label>
        <p class="form-control-static">@Model.Username</p>
    </div>
</div>
Resource Server
Now we’ll create a web api that will be accessed by our client application. This API will be protected using our authentication server. Create a new Web API project and add following nuget packages.
- Owin.Host.SystemWeb
- Aspnet.WebApi.Owin
We’ll just add a simple controller and an action method that returns only “Hello World” and we’ll add authorize attribute on that method.
public class GreetingsController : ApiController
{
  [Authorize]
  [HttpGet]
  public IHttpActionResult Get()
  {
    return Ok("Hello World");
  }
}
We’ll configure the API to use our Authentication Server as OpenID Connect Provider(OP) as shown below.
public class Startup
{
  public void Configuration(IAppBuilder app)
  {
    app.UseIdentityServerBearerTokenAuthentication(new IdentityServerBearerTokenAuthenticationOptions
    {
      Authority = "https://localhost:44374/identity",
      RequiredScopes = new[] { "GreetingsAPI" }
    });
  }
}
Here we have specified “RequiredScopes” as “GreetingsAPI”; which is our custom scope that we have registered with OP. So if any client application that wish to access this API must provide a Bearer Authentication Token that contains “GreetingsAPI” scope. So to be able to access this API our client needs to send request to our OP to get Access Token. We’ll use Client Credential flow and “TokenClient” class to get Access Token.
Create a new Action Method in “HomeController” of Client Application. This method will first get the access token and then using this access token it will call the API created above.
private string APIUrl = "http://localhost:58340/api";
private string AuthServerUrl = "https://localhost:44374";

public async Task<actionresult> CallAPIWithToken()
{
  var tokenUrl = $"{AuthServerUrl}/identity/connect/token";
  var tokenClient = new TokenClient(tokenUrl, "GreetingAPIClient", "secret");
  var tokenResponse = await tokenClient.RequestClientCredentialsAsync("GreetingsAPI");
  using (var client = new HttpClient())
  {
    client.SetBearerToken(tokenResponse.AccessToken);
    var result = await client.GetStringAsync(APIUrl + "/Greetings");
    return View((object)result);
  }
}
</actionresult>
Full source code for identity server demo using in memory client and users is available on below github link.
https://github.com/shaileshsakaria/IdentityServerDemo